


Ford Focus Rear Lip – Zetec Style (Mk3 2012-2014)
SKU: 013033
Commonly Stocked Item - Please contact us to confirm stock
Ford Focus Rear Lip – Zetec Style (Mk3 2012-2014)
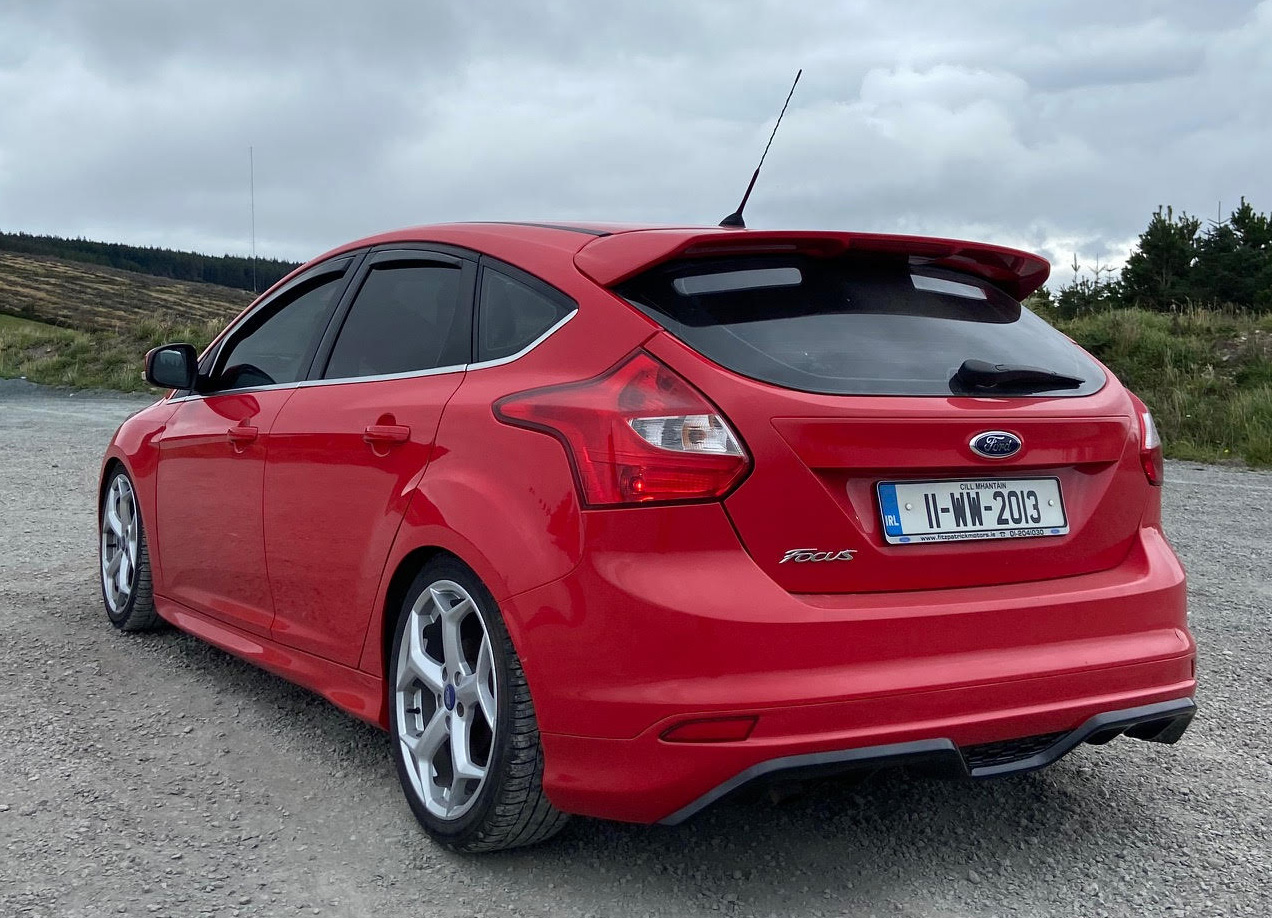
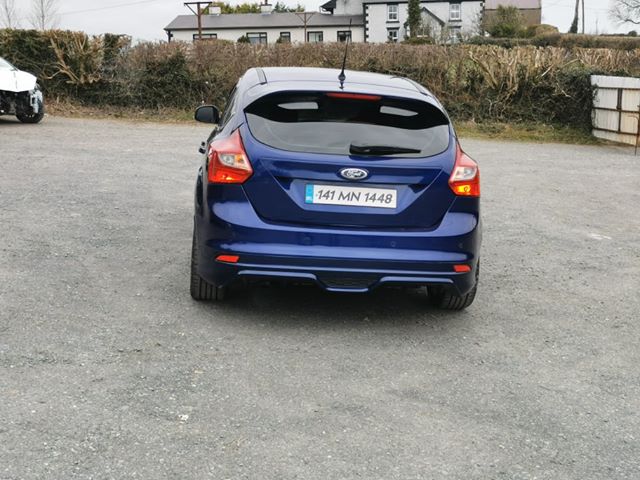
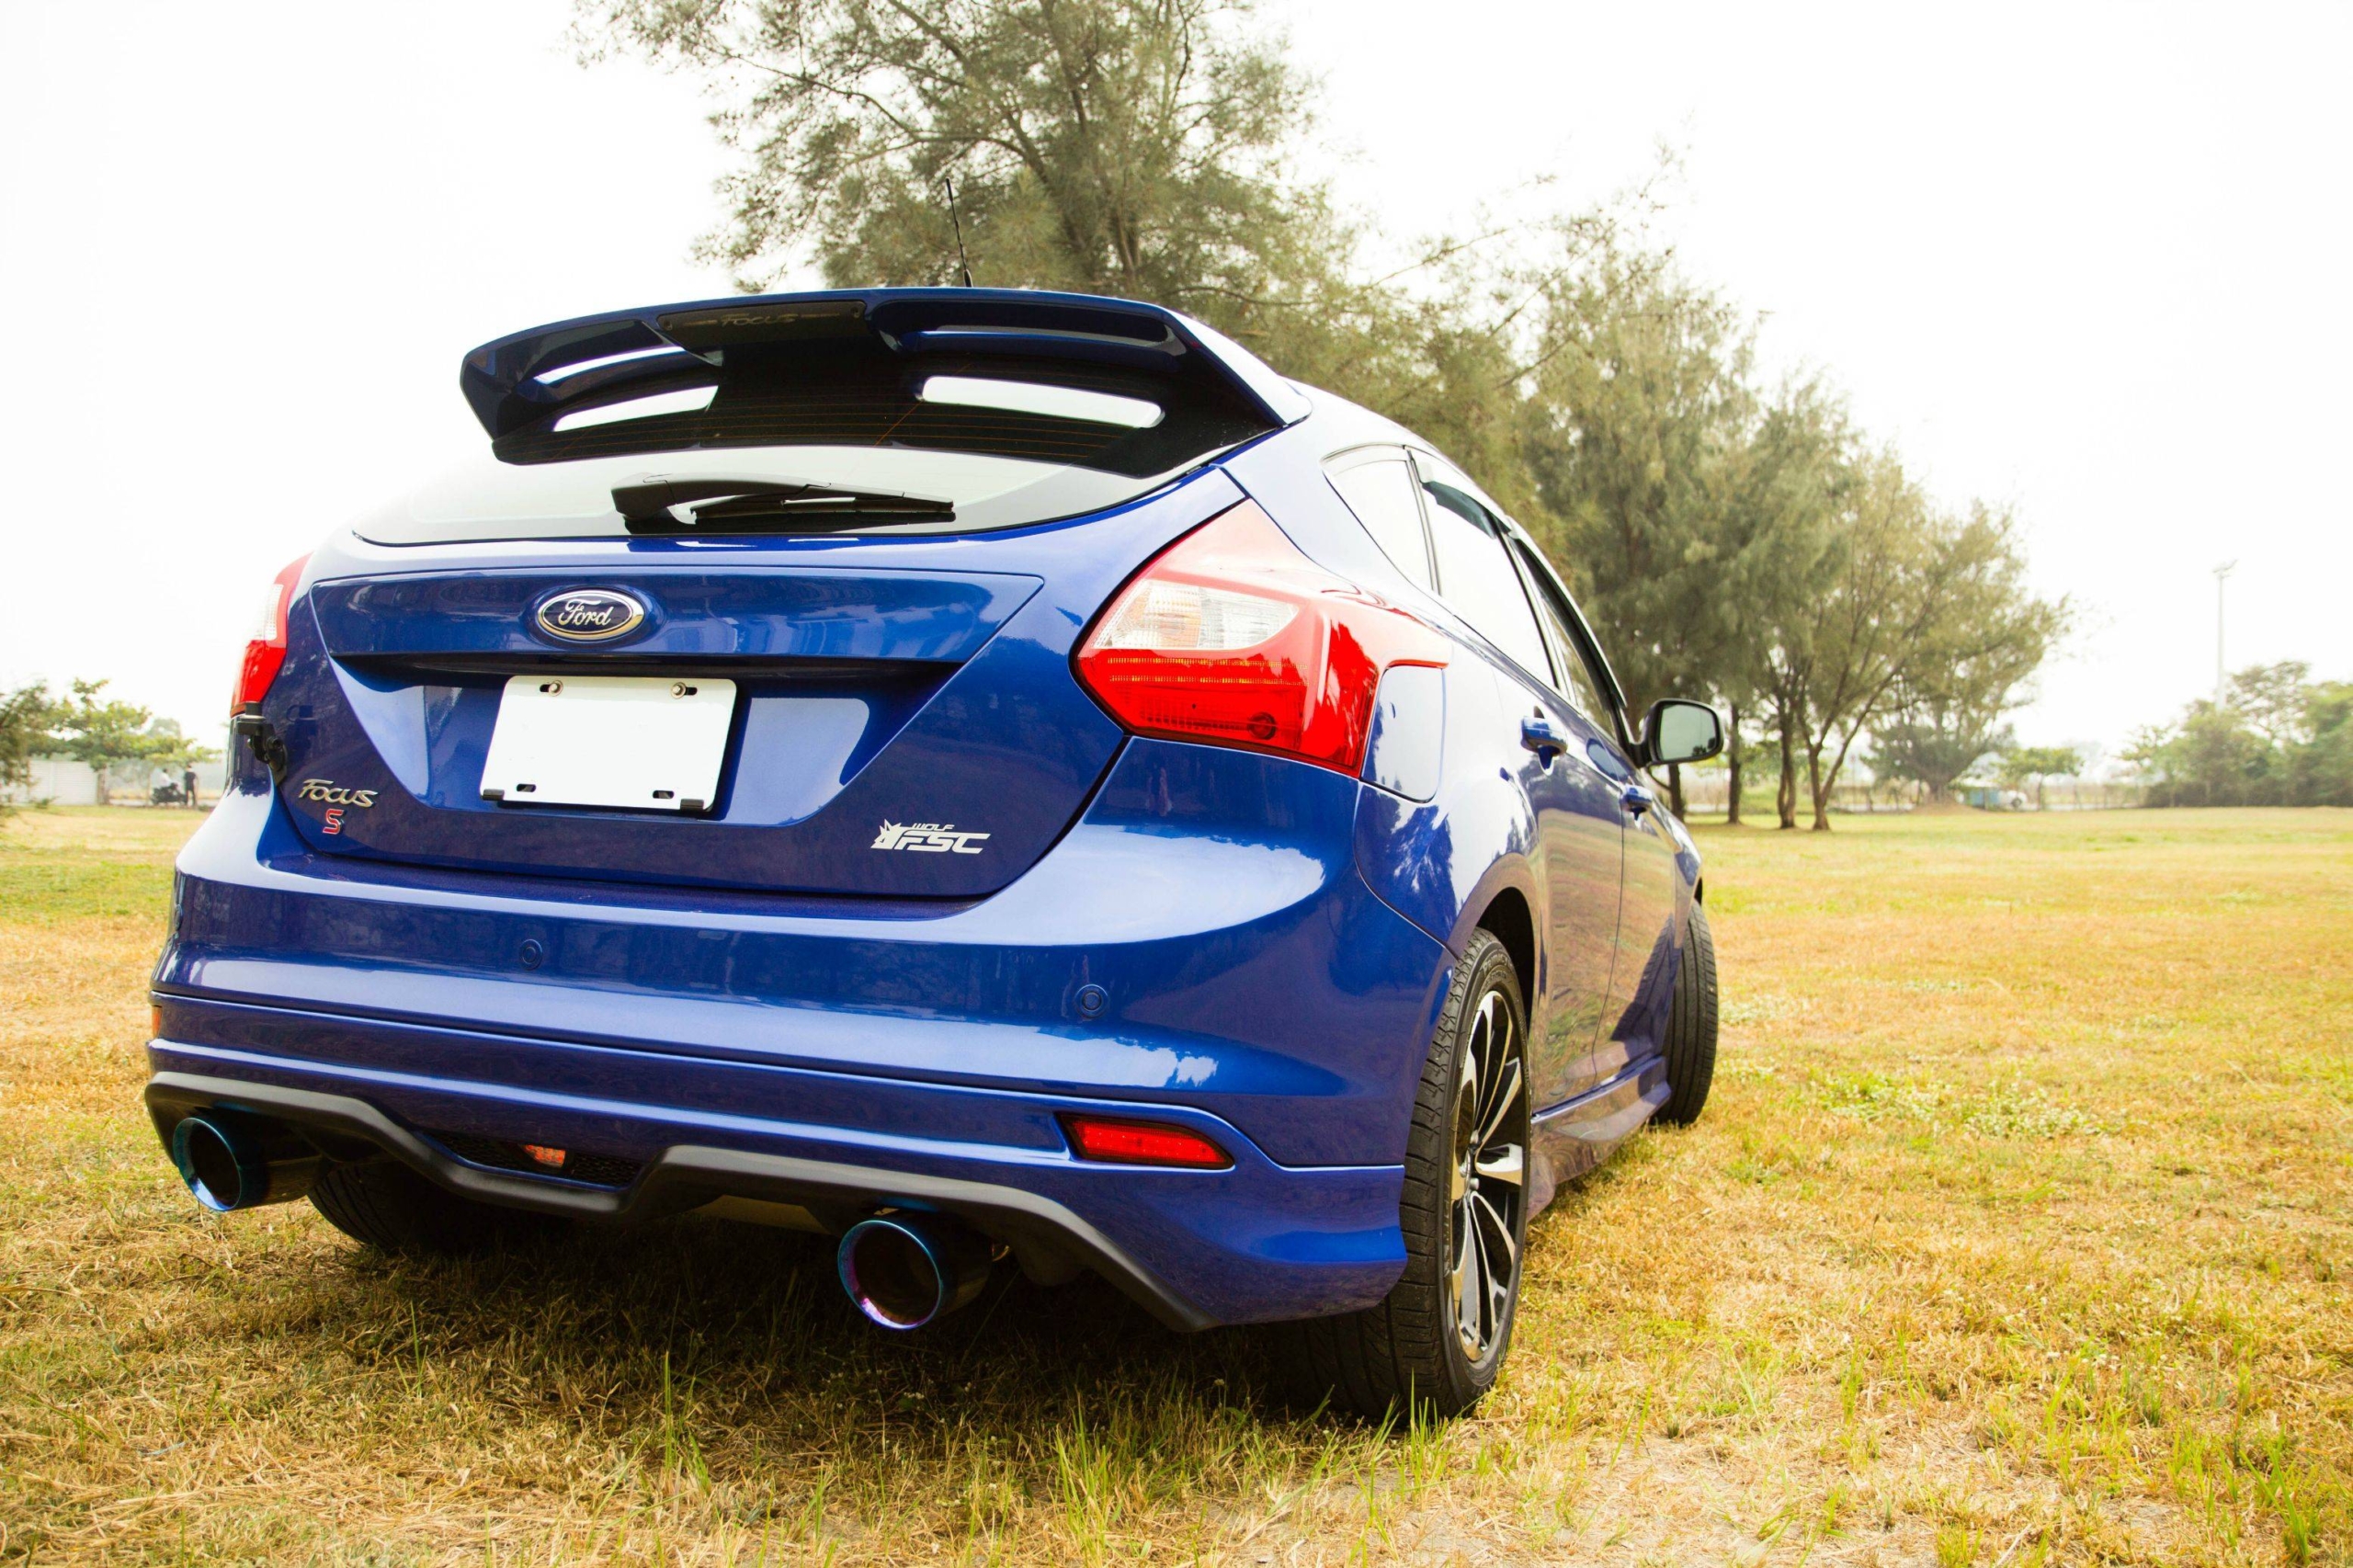
Elevate the style of your Ford Focus Mk3 with the Pre-Facelift SE Zetec Rear Lip. Designed to perfectly complement the sleek lines of the Mk3, this rear lip adds a sporty and refined touch to your vehicle while maintaining a factory-fit appearance. It’s an ideal upgrade for those seeking a more dynamic look for their Focus. Ford Focus Mk3 Rear Lip
Price:
€165.00€134.15 Inc VATExcl VAT
€165.00€134.15 Inc VATExcl VAT
IN STOCK
Description
Ford Focus Rear Lip – Zetec Style (Mk3 2012-2014)
Elevate the style of your Ford Focus Mk3 with the Pre-Facelift SE Zetec Rear Lip. Designed to perfectly complement the sleek lines of the Mk3, this rear lip adds a sporty and refined touch to your vehicle while maintaining a factory-fit appearance. It’s an ideal upgrade for those seeking a more dynamic look for their Focus. Ford Focus Mk3 Rear Lip
Key Features:
- Custom Fit: Specifically designed for the Ford Focus Mk3 Pre-Facelift SE Zetec, ensuring seamless integration.
- Sporty Design: Enhances the rear profile with a sleek and aggressive aesthetic.
- Durable Construction: Made from high-quality materials to ensure long-lasting performance and resistance to wear.
- Easy Installation: Engineered for straightforward fitting with minimal effort required.
This rear lip not only boosts the visual appeal of your Focus Mk3 but also adds a touch of aerodynamic functionality. Whether you’re upgrading for style or to give your car a sportier edge, the SE Zetec Rear Lip is a must-have addition.
Fiberglass Rear Lip/Insert to suit 2012-2014 Prefacelift SE Model Focus.
** FIBERGLASS KIT – ALWAYS TEST FIT BEFORE SPRAYING AS MODIFICATION WILL MOST LIKELY BE NEEDED!!
PLEASE USE A PANEL BEATER WHO IS FAMILIAR WITH FIBERGLASS!
Preparation
1. Inspect the Part:
Check for any cracks, imperfections, or damage during shipping. Minor imperfections are common and can usually be sanded or filled.
Test the part against the vehicle to assess the initial fit.
2. Prepare the Surface:
Clean both the fiberglass part and the car’s surface thoroughly with a degreaser to remove dirt, oil, or contaminants.
Sand the edges and contact points of the fiberglass part for a smoother fit.
3. Test Fit:
Dry-fit the part on the car without adhesives or fasteners to identify alignment issues or areas that may require trimming.
Mark problem areas with tape or a marker for later adjustments.
Adjustment
1. Trimming and Sanding:
Use a rotary tool, angle grinder, or sandpaper to trim or reshape areas where the part does not align properly.
Work slowly and check the fit frequently to avoid over-trimming.
2. Filling Gaps:
Use body filler or fiberglass resin to smooth gaps or imperfections between the part and the vehicle.
Sand the filler once it cures to create a smooth surface.
3. Reinforcement:
Reinforce weak or thin areas of the part with additional fiberglass layers if necessary, especially around mounting points.
Installation
1. Drilling Mounting Holes:
If mounting holes are not pre-drilled, carefully mark their positions during the test fit.
Drill small pilot holes first, then enlarge them as needed, using caution to avoid cracking the fiberglass.
2. Securing the Part:
Use the appropriate fasteners, such as bolts, screws, or clips, depending on the part and vehicle.
Avoid overtightening, as this can crack the fiberglass.
3. Adhesive Application (Recommended Technique):
For parts requiring adhesives (e.g., panels or spoilers), use a high-quality automotive adhesive or bonding agent such as tech7, tigerseal, windscreen bond etc.
Follow the adhesive manufacturer’s instructions for curing times and application methods.
Finishing
1. Primer and Paint:
Fiberglass parts often require a primer before painting. Use an automotive-grade primer and sand lightly between coats.
Apply automotive paint in multiple thin layers, allowing adequate drying time between each coat.
2. Protective Coating:
Seal the part with a clear coat for added protection against UV rays, dirt, and weather.
3. Final Inspection:
Check the alignment and fit after installation. Make any minor adjustments if needed.
Additional Tips
Professional Installation:
If you’re unsure about the process, consider professional fitting and painting services to ensure the best results.
Follow Manufacturer’s Guidelines:
Always consult the manufacturer’s instructions specific to the fiberglass part.
Regular Maintenance:
Inspect the part periodically for any signs of wear, loose fittings, or cracks, and address issues promptly.
Proper preparation and care will result in a flawless look and functional installation of your fiberglass car parts.
All parts MUST always be test fitted before spraying – Sprayed parts cannot be returned!!
THIS PRODUCT FITS ON THE FOLLOWING CAR MODELS:
-
Description
Description
Ford Focus Rear Lip – Zetec Style (Mk3 2012-2014)
Elevate the style of your Ford Focus Mk3 with the Pre-Facelift SE Zetec Rear Lip. Designed to perfectly complement the sleek lines of the Mk3, this rear lip adds a sporty and refined touch to your vehicle while maintaining a factory-fit appearance. It’s an ideal upgrade for those seeking a more dynamic look for their Focus. Ford Focus Mk3 Rear Lip
Key Features:
- Custom Fit: Specifically designed for the Ford Focus Mk3 Pre-Facelift SE Zetec, ensuring seamless integration.
- Sporty Design: Enhances the rear profile with a sleek and aggressive aesthetic.
- Durable Construction: Made from high-quality materials to ensure long-lasting performance and resistance to wear.
- Easy Installation: Engineered for straightforward fitting with minimal effort required.
This rear lip not only boosts the visual appeal of your Focus Mk3 but also adds a touch of aerodynamic functionality. Whether you’re upgrading for style or to give your car a sportier edge, the SE Zetec Rear Lip is a must-have addition.
Fiberglass Rear Lip/Insert to suit 2012-2014 Prefacelift SE Model Focus.
** FIBERGLASS KIT – ALWAYS TEST FIT BEFORE SPRAYING AS MODIFICATION WILL MOST LIKELY BE NEEDED!!
PLEASE USE A PANEL BEATER WHO IS FAMILIAR WITH FIBERGLASS!
Preparation
1. Inspect the Part:
Check for any cracks, imperfections, or damage during shipping. Minor imperfections are common and can usually be sanded or filled.
Test the part against the vehicle to assess the initial fit.2. Prepare the Surface:
Clean both the fiberglass part and the car’s surface thoroughly with a degreaser to remove dirt, oil, or contaminants.
Sand the edges and contact points of the fiberglass part for a smoother fit.3. Test Fit:
Dry-fit the part on the car without adhesives or fasteners to identify alignment issues or areas that may require trimming.
Mark problem areas with tape or a marker for later adjustments.Adjustment
1. Trimming and Sanding:
Use a rotary tool, angle grinder, or sandpaper to trim or reshape areas where the part does not align properly.
Work slowly and check the fit frequently to avoid over-trimming.2. Filling Gaps:
Use body filler or fiberglass resin to smooth gaps or imperfections between the part and the vehicle.
Sand the filler once it cures to create a smooth surface.3. Reinforcement:
Reinforce weak or thin areas of the part with additional fiberglass layers if necessary, especially around mounting points.
Installation
1. Drilling Mounting Holes:
If mounting holes are not pre-drilled, carefully mark their positions during the test fit.
Drill small pilot holes first, then enlarge them as needed, using caution to avoid cracking the fiberglass.2. Securing the Part:
Use the appropriate fasteners, such as bolts, screws, or clips, depending on the part and vehicle.
Avoid overtightening, as this can crack the fiberglass.3. Adhesive Application (Recommended Technique):
For parts requiring adhesives (e.g., panels or spoilers), use a high-quality automotive adhesive or bonding agent such as tech7, tigerseal, windscreen bond etc.
Follow the adhesive manufacturer’s instructions for curing times and application methods.Finishing
1. Primer and Paint:
Fiberglass parts often require a primer before painting. Use an automotive-grade primer and sand lightly between coats.
Apply automotive paint in multiple thin layers, allowing adequate drying time between each coat.2. Protective Coating:
Seal the part with a clear coat for added protection against UV rays, dirt, and weather.
3. Final Inspection:
Check the alignment and fit after installation. Make any minor adjustments if needed.
Additional Tips
Professional Installation:
If you’re unsure about the process, consider professional fitting and painting services to ensure the best results.
Follow Manufacturer’s Guidelines:
Always consult the manufacturer’s instructions specific to the fiberglass part.
Regular Maintenance:
Inspect the part periodically for any signs of wear, loose fittings, or cracks, and address issues promptly.
Proper preparation and care will result in a flawless look and functional installation of your fiberglass car parts.
All parts MUST always be test fitted before spraying – Sprayed parts cannot be returned!!
- Additional information
-
Reviews (0)
Reviews
There are no reviews yet.
-
Fitments
THIS PRODUCT FITS ON THE FOLLOWING CAR MODELS:
Ford Focus Mk3 [C346] (2012-2018)




 MCG Autostyling, Castle Street, Kells, Co Meath,
Ireland
MCG Autostyling, Castle Street, Kells, Co Meath,
Ireland 046-9240899


Reviews
There are no reviews yet.